I. Introduction
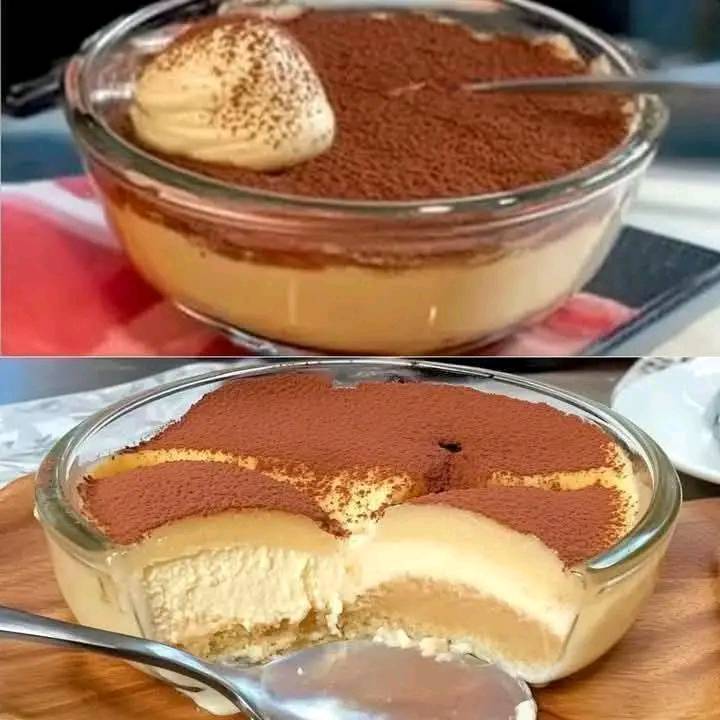
If you love tiramisu, but want a quicker, easier, and more portable version, Tiramisu Pudding Cups are the perfect solution! These individually portioned desserts combine the rich flavors of espresso-soaked ladyfingers, creamy mascarpone pudding, and cocoa dusting in a convenient cup.
Whether you’re hosting a party, meal prepping desserts, or just craving a sweet treat, these pudding cups bring all the indulgence of traditional tiramisu with a simplified, no-bake approach.
II. Why You’ll Love Tiramisu Pudding Cups
✔️ Easy to Make – No baking required!
✔️ Perfect for Any Occasion – Great for parties, holidays, or meal prep.
✔️ Rich & Creamy – Layers of luscious mascarpone pudding and coffee-infused ladyfingers.
✔️ Make-Ahead Friendly – Even better after chilling overnight!
✔️ Customizable – Add chocolate chips, liqueur, or different cookies for variety.
III. Ingredients for Tiramisu Pudding Cups
Base Ingredients:
- 1 cup strong brewed espresso or coffee, cooled
- 2 tablespoons sugar (for the coffee mixture)
- 10-12 ladyfinger cookies (Savoiardi)
- 1 cup mascarpone cheese, softened
- 1 cup heavy cream
- ½ cup whole milk
- ½ cup powdered sugar
- 1 teaspoon vanilla extract
- 1 package instant vanilla pudding mix (3.4 oz)
- Unsweetened cocoa powder, for dusting
- Dark chocolate shavings (optional)
Optional Add-Ins:
- 2 tablespoons coffee liqueur (like Kahlúa) for a boozy version
- ½ teaspoon cinnamon for extra warmth
- Chocolate chips or grated chocolate for extra richness
IV. Step-by-Step Recipe for Tiramisu Pudding Cups
Step 1: Prepare the Coffee Mixture
- Brew 1 cup of strong coffee or espresso, then let it cool.
- Stir in 2 tablespoons of sugar (and coffee liqueur if using).
Step 2: Make the Mascarpone Pudding
- In a bowl, whisk together vanilla pudding mix and whole milk until smooth.
- Add mascarpone cheese, heavy cream, powdered sugar, and vanilla extract.
- Beat until light and fluffy, about 2–3 minutes.
Step 3: Assemble the Layers
- Break ladyfingers into pieces and dip them briefly into the coffee mixture (don’t oversoak!).
- Place a layer of coffee-soaked ladyfingers at the bottom of each serving cup.
- Add a layer of mascarpone pudding on top.
- Repeat the process, creating two or three layers depending on the cup size.
Step 4: Add the Finishing Touches
- Dust the top with unsweetened cocoa powder using a fine sieve.
- Sprinkle with chocolate shavings or chocolate chips for extra decadence.
- Cover and chill for at least 2 hours, preferably overnight for best flavor.
V. Customization Ideas
🍫 Chocolate Lovers’ Version – Add melted chocolate into the pudding mix.
🍓 Berry Twist – Layer fresh raspberries or strawberries between layers.
🍪 Cookie Swap – Use crushed Oreos or Biscoff cookies instead of ladyfingers.
🥃 Boozy Upgrade – Swap vanilla extract with Baileys, Amaretto, or Kahlúa.
VI. How to Store & Serve
1. Storing Leftovers
- Keep covered in the fridge for up to 3 days.
- Do not freeze (mascarpone can become grainy).
2. Serving Tips
- Serve chilled, directly from the fridge.
- Add extra cocoa powder or whipped cream before serving for a fresh look.
VII. FAQs
1. Can I use cream cheese instead of mascarpone?
✅ Yes, but mascarpone gives the best authentic tiramisu flavor.
2. How can I make it kid-friendly?
☕ Use decaf coffee or skip the coffee entirely.
3. Can I make these in advance?
✅ Yes! They taste even better after chilling overnight.
VIII. Conclusion – A Must-Try Dessert!
Tiramisu Pudding Cups are the perfect blend of convenience and indulgence. With layers of espresso-kissed ladyfingers and rich mascarpone pudding, this no-bake dessert is sure to impress at any gathering.
Have you tried making tiramisu pudding cups? Share your thoughts and favorite twists in the comments below! 🍮☕🍫