Introduction
Looking for the perfect Easter dessert that’s both impressive and easy to make? These Easter No-Bake Mini Swirl Cheesecakes are the answer! Skip the oven and embrace the simplicity of a creamy, dreamy cheesecake with a festive swirl of color. These individual treats are not only adorable but also a guaranteed crowd-pleaser. Perfect for Easter brunch, dessert tables, or even a special springtime treat, these mini cheesecakes will quickly become a family favorite. Get ready to indulge in a delightful combination of flavors and textures that capture the essence of Easter.
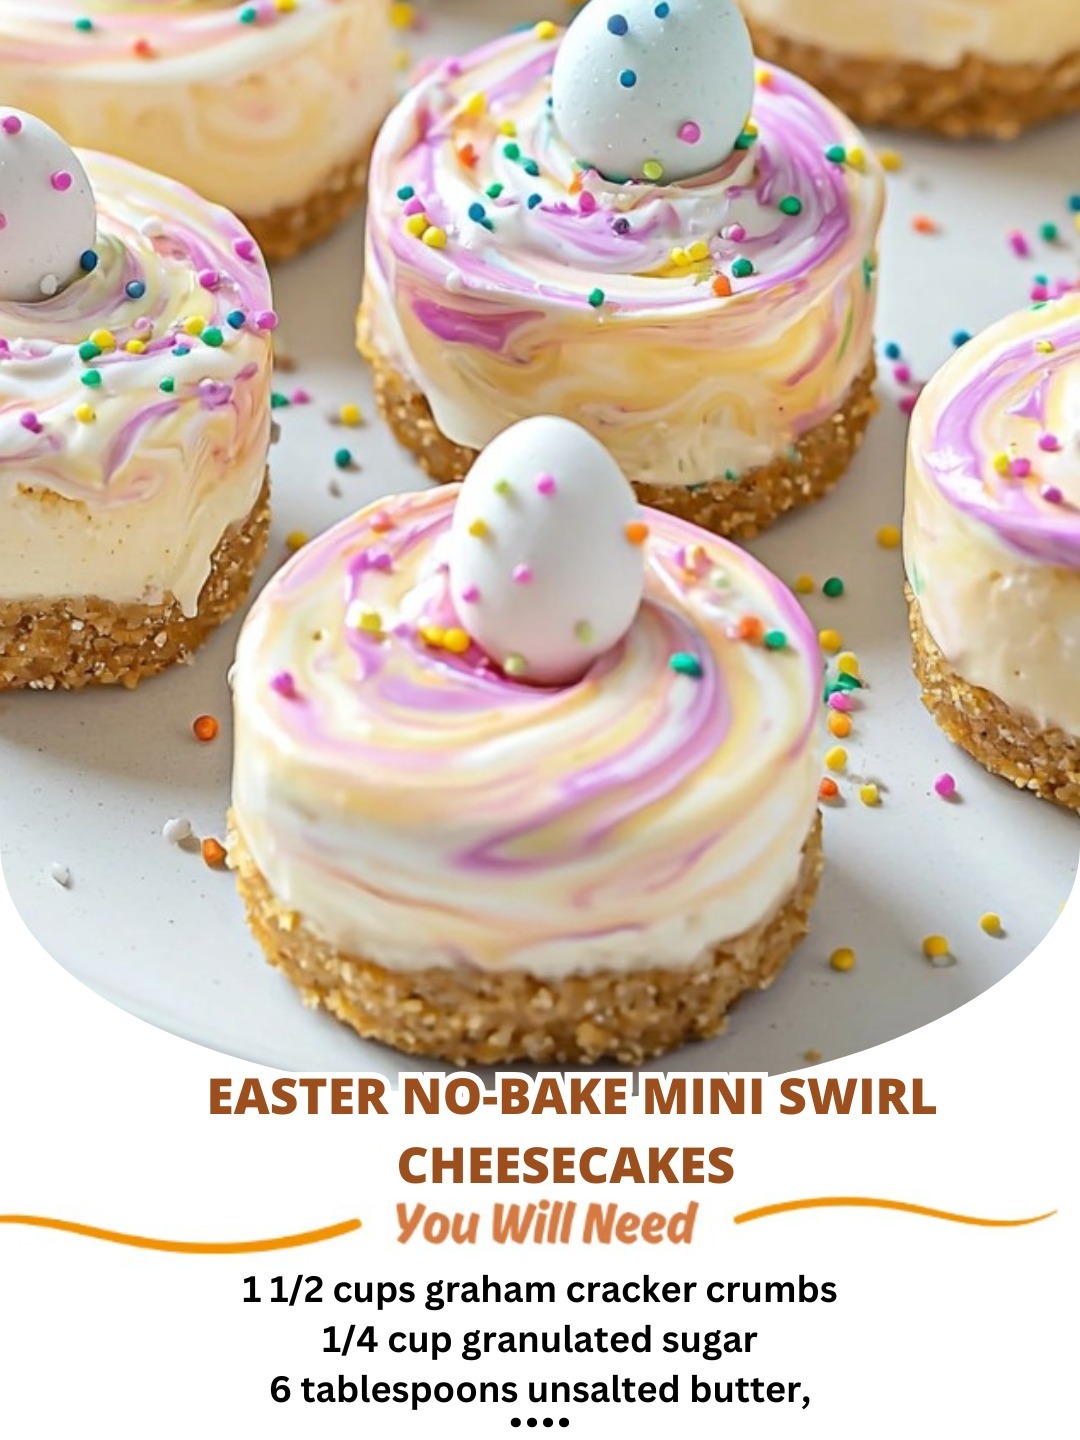
Easter No-Bake Mini Swirl Cheesecakes: A Step-by-Step Guide
Gathering Your Ingredients
Before you begin, make sure you have all your ingredients ready. This will streamline the process and ensure a smooth cheesecake-making experience.
- Crust:
- 1 ½ cups graham cracker crumbs
- 6 tablespoons unsalted butter, melted
- ¼ cup granulated sugar
- Cheesecake Filling:
- 2 (8 ounce) packages cream cheese, softened
- ¾ cup granulated sugar
- 1 teaspoon vanilla extract
- ½ cup heavy cream
- Swirl:
- Gel food coloring (pink, blue, yellow, green – your choice!)
Preparing the Graham Cracker Crust
The foundation of these mini cheesecakes is a simple, yet delicious, graham cracker crust. Here’s how to make it:
- In a medium bowl, combine the graham cracker crumbs, melted butter, and granulated sugar.
- Mix well until the crumbs are evenly moistened.
- Press the mixture firmly into the bottom of 12 muffin liners placed in a muffin tin.
- Refrigerate the crusts while you prepare the cheesecake filling.
Making the No-Bake Cheesecake Filling
This is where the magic happens! The creamy, dreamy filling is the heart of these mini cheesecakes.
- In a large bowl, beat the softened cream cheese and granulated sugar together until smooth and creamy.
- Add the vanilla extract and heavy cream. Beat until well combined and the mixture is light and fluffy. Be careful not to overbeat.
Creating the Easter Swirl
Now for the fun part – adding the festive swirls! This is where you can get creative and make your cheesecakes truly unique.
- Divide the cheesecake filling into several small bowls (one for each color you’re using).
- Add a few drops of gel food coloring to each bowl and gently stir until the color is evenly distributed. Remember, a little goes a long way!
- Spoon dollops of each colored filling randomly over the graham cracker crusts.
- Use a toothpick or small skewer to gently swirl the colors together. Be careful not to over-mix, as this will muddy the colors.
Chilling and Serving
Patience is key! Allowing the cheesecakes to chill properly is essential for them to set up and achieve the perfect texture.
- Refrigerate the mini cheesecakes for at least 4 hours, or preferably overnight.
- Before serving, gently remove the cheesecakes from the muffin liners.
- Garnish with your favorite Easter candies, sprinkles, or fresh berries.
Tips and Tricks for Perfect Mini Cheesecakes
- Soften the Cream Cheese: Ensure your cream cheese is completely softened to avoid lumps in the filling.
- Gel Food Coloring: Gel food coloring is recommended for vibrant colors without affecting the consistency of the filling. Liquid food coloring can make the filling too watery.
- Adjust Sweetness: Adjust the amount of sugar to your liking. If you prefer a less sweet cheesecake, reduce the sugar slightly.
- Variations: Get creative with the flavors! Add lemon zest, almond extract, or even a hint of coconut to the filling.
- Storage: Store leftover mini cheesecakes in the refrigerator for up to 3 days.
Conclusion
These Easter No-Bake Mini Swirl Cheesecakes are a delightful and easy way to celebrate the holiday. Their creamy texture, vibrant swirls, and individual portions make them a perfect addition to any Easter gathering. With minimal effort and maximum flavor, you’ll impress your family and friends with these adorable and delicious treats. So, gather your ingredients, get creative with the swirls, and enjoy the sweet taste of Easter!