Introduction
Craving a sweet and nostalgic treat? Look no further than homemade Cherry Mash Truffles! This recipe combines the classic flavors of cherry, peanuts, and chocolate into decadent, bite-sized delights. Perfect for holiday gifts, party favors, or simply indulging your sweet tooth, these truffles are surprisingly easy to make and guaranteed to impress. Get ready to experience a burst of flavor that will transport you back to childhood.
Main Sections
What is Cherry Mash?
For those unfamiliar, Cherry Mash is a classic American candy bar featuring a cherry-flavored fondant center coated in chopped peanuts and chocolate. This recipe aims to recreate those iconic flavors in a truffle form, providing a richer and more luxurious experience.
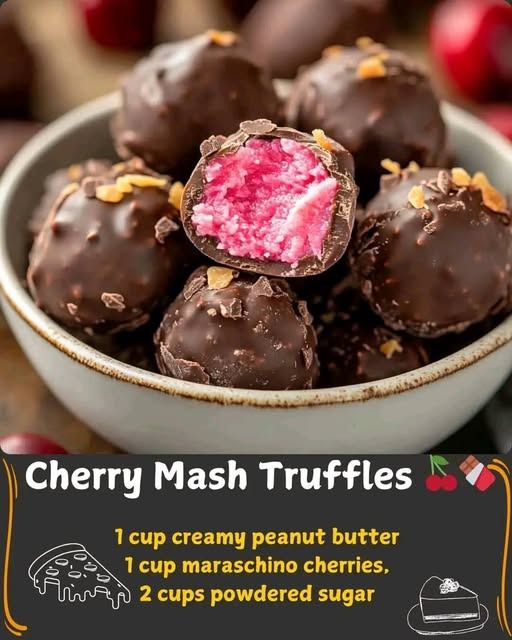
Ingredients You’ll Need
- Cherry Chips/Melts: Essential for that authentic cherry flavor. Look for them in specialty baking stores or online.
- Sweetened Condensed Milk: Provides a creamy, rich texture.
- Powdered Sugar: Adds sweetness and structure to the truffle filling.
- Roasted Peanuts: Chopped finely for a satisfying crunch and nutty flavor.
- Chocolate Coating: Use your favorite melting chocolate – dark, milk, or semi-sweet.
- Vegetable Shortening (Optional): Helps create a smoother, more dippable chocolate coating.
Step-by-Step Recipe
- Prepare the Cherry Filling: Melt the cherry chips/melts according to package directions. Be careful not to overheat them!
- Combine Ingredients: In a bowl, combine the melted cherry chips, sweetened condensed milk, and powdered sugar. Mix well until smooth and creamy.
- Add Peanuts: Stir in most of the chopped roasted peanuts, reserving some for topping.
- Chill the Mixture: Cover the bowl with plastic wrap and refrigerate for at least 2 hours, or preferably overnight, to allow the mixture to firm up.
- Shape the Truffles: Once chilled, use a spoon or small cookie scoop to form the mixture into small balls.
- Melt the Chocolate: Melt the chocolate coating according to package directions. Add a small amount of vegetable shortening for a smoother consistency, if desired.
- Dip the Truffles: Dip each truffle into the melted chocolate, ensuring it’s fully coated. Use a fork or dipping tools to help.
- Decorate: Immediately sprinkle the dipped truffles with the reserved chopped peanuts.
- Set and Enjoy: Place the truffles on a parchment-lined baking sheet and allow the chocolate to set completely. You can speed up the process by placing them in the refrigerator.
Tips for Success
- Don’t Overheat the Cherry Chips: Burnt cherry chips can ruin the flavor of your truffles. Melt them slowly and stir frequently.
- Chill Thoroughly: Adequate chilling time is crucial for firm truffles that are easy to handle.
- Use Quality Chocolate: The quality of your chocolate will directly impact the final flavor of the truffles.
- Get Creative with Decorations: Feel free to experiment with different toppings, such as sprinkles, chopped pecans, or even a drizzle of white chocolate.
Variations
- Peanut Butter Cherry Mash Truffles: Add a tablespoon or two of peanut butter to the cherry filling for an extra layer of flavor.
- White Chocolate Cherry Mash Truffles: Use white chocolate for the coating for a sweeter, more delicate truffle.
- Dark Chocolate Cherry Mash Truffles: Opt for dark chocolate for a richer, more intense flavor profile.
Conclusion
These Cherry Mash Truffles are a delightful homemade treat that captures the essence of the beloved candy bar. With their creamy cherry filling, crunchy peanuts, and smooth chocolate coating, they are sure to be a hit with everyone. So, gather your ingredients, follow our easy recipe, and prepare to indulge in a truly unforgettable experience. Happy truffle-making!