Introduction
Craving a melt-in-your-mouth sandwich made with the perfect sourdough bread? Forget store-bought! Baking your own soft sourdough sandwich bread is easier than you think, and the flavor is unmatched. This guide provides you with everything you need to know, from selecting the right ingredients to achieving that coveted soft crumb.
Baking the Ultimate Soft Sourdough Sandwich Bread
Understanding Sourdough Softness
Achieving a soft sourdough loaf requires a few key adjustments to the typical sourdough process. We’ll focus on hydration, fat content, and proofing to create a truly tender bread.
Essential Ingredients
Here’s what you’ll need to gather:
- Active Sourdough Starter: A lively starter is crucial for that characteristic sourdough tang and rise. Ensure it’s bubbly and doubled in size after feeding.
- Bread Flour: High protein content in bread flour contributes to gluten development, essential for structure and chew.
- All-Purpose Flour: A little bit of all-purpose flour helps keep the crumb softer than using all bread flour.
- Water: Filtered water is best. Pay attention to the temperature – lukewarm water activates the yeast.
- Salt: Salt controls yeast activity and enhances flavor.
- Fat (Optional but Recommended): Adding a touch of fat, like olive oil or butter, tenderizes the dough and adds richness. We will use olive oil in this recipe.
- Honey or Sugar (Optional): A small amount of sweetener can contribute to a softer crumb and a slight sweetness.
Step-by-Step Baking Process
- Prepare the Levain: Mix a portion of your starter with flour and water. Let it ferment until doubled and bubbly – this typically takes 4-6 hours.
- Autolyse: Combine the flour and most of the water (reserve a small amount for later) in a bowl. Let it rest for 30-60 minutes. This hydrates the flour and develops gluten.
- Mix the Dough: Add the levain, salt, honey (if using), olive oil, and remaining water to the autolysed flour. Mix until a shaggy dough forms.
- Bulk Fermentation: This is where the magic happens! Perform stretch and folds every 30-45 minutes for the first 2-3 hours. This develops strength in the dough. Let the dough bulk ferment for a total of 4-6 hours, or until almost doubled. The timing will vary based on your starter’s strength and room temperature.
- Shape the Loaf: Gently shape the dough into a rectangular loaf.
- Proofing: Place the shaped dough in a greased and floured loaf pan. Proof until the dough nearly doubles, about 1-3 hours, depending on room temperature. You can also proof overnight in the refrigerator for enhanced flavor.
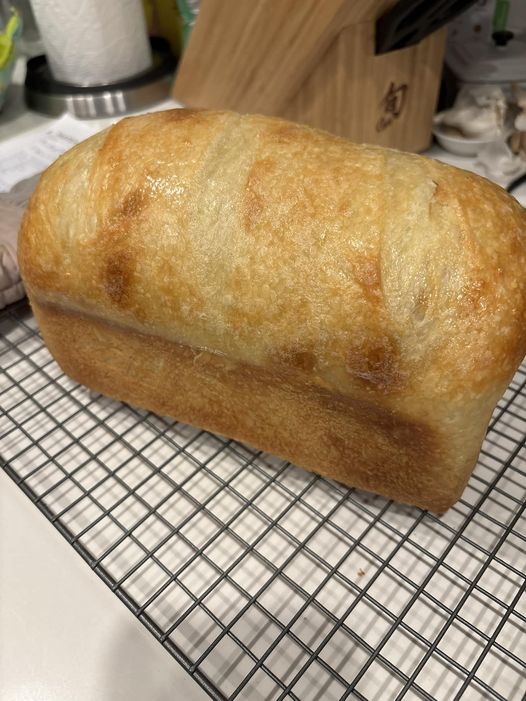
- Baking: Preheat your oven to 400°F (200°C). Bake for 30-40 minutes, or until the internal temperature reaches 200-210°F (93-99°C) and the top is golden brown. Tent with foil if it’s browning too quickly.
- Cooling: Let the bread cool completely in the loaf pan before slicing. This prevents a gummy texture.
Tips for a Softer Crumb
- Higher Hydration: A wetter dough translates to a softer bread. Aim for around 75-80% hydration.
- Use a Little Oil: The olive oil helps create a tender loaf.
- Don’t Overbake: Overbaking dries out the bread. Use a thermometer to ensure perfect doneness.
- Proper Proofing: Under-proofed bread will be dense; over-proofed bread will collapse. Look for significant rise but don’t let it get too bubbly or jiggly.
Troubleshooting
- Dense Bread: This could be due to a weak starter, under-proofing, or over-baking.
- Gummy Texture: Likely caused by slicing the bread while it’s still warm.
- Too Sour: Reduce the amount of levain or shorten the bulk fermentation time.
Conclusion
Baking soft sourdough sandwich bread requires patience and attention to detail, but the result – a delicious, homemade loaf that elevates any sandwich – is well worth the effort. Experiment with these techniques and find what works best for your kitchen. Happy baking!