Craving Eclairs? Skip the Baking with This No-Bake Chocolate Eclair Cake!
Let’s face it: Eclairs are divine. But the thought of making pâte à choux can send even seasoned bakers running for the hills. Good news! You can have all the deliciousness of a classic chocolate eclair without ever turning on your oven. Enter the No-Bake Chocolate Eclair Cake! This easy dessert is perfect for potlucks, summer parties, or any time you need a sweet treat in a hurry. We’ll show you how to whip up this crowd-pleaser in no time.
Making Magic: Assembling Your No-Bake Eclair Cake
This recipe relies on a few clever shortcuts to achieve that authentic eclair taste and texture. Instead of making pastry, we use graham crackers! They soften perfectly to mimic the eclair shell, and the creamy filling and chocolate frosting tie everything together beautifully.
The Graham Cracker Foundation
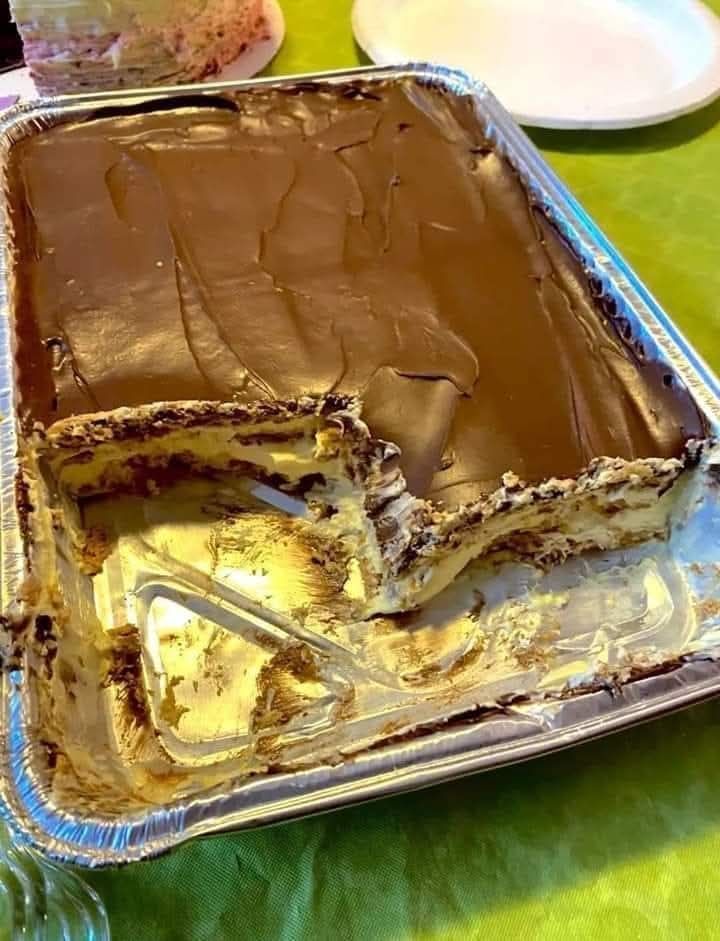
The base of our no-bake eclair cake is, of course, graham crackers. You’ll want to use the regular-sized graham crackers, not the honey or cinnamon ones. A standard rectangular baking dish (9×13 inches) works best. The key is to arrange the graham crackers in a single layer, breaking them as needed to fit snugly. This creates the “eclair shell” foundation.

The Creamy Filling: It’s All About the Pudding!
Forget complicated pastry cream! We’re using instant vanilla pudding for the filling. This saves tons of time and effort. To make the filling, you’ll combine the instant vanilla pudding mix with cold milk. Some recipes use Cool Whip to lighten the filling, which you can definitely do for an extra airy texture. Experiment to find your preference. Just remember to whisk the pudding and milk together until smooth and thickened.
Here’s a quick breakdown:
- Combine instant vanilla pudding mix and cold milk.
- Whisk until smooth and thickened.
- Optional: Fold in Cool Whip for a lighter texture.

Chocolate Dreams: The Decadent Frosting
No eclair is complete without its signature chocolate frosting! While you can certainly make your own from scratch, we’re keeping things simple with a homemade chocolate frosting. This version utilizes cocoa powder, melted butter, milk and powdered sugar for a glossy, rich finish. This frosting is both easy to make and incredibly delicious!

Putting It All Together: Step-by-Step Assembly
Now for the fun part! Assembling the no-bake eclair cake is all about layering.
- **First Layer:** Arrange a single layer of graham crackers in your baking dish.
- **Second Layer:** Spread half of the vanilla pudding mixture evenly over the graham crackers.
- **Third Layer:** Add another layer of graham crackers.
- **Fourth Layer:** Spread the remaining vanilla pudding mixture over the graham crackers.
- **Fifth Layer:** Top with a final layer of graham crackers.
- **Final Touch:** Pour the chocolate frosting evenly over the entire cake.
Chill Out: Refrigeration is Key
This step is crucial! Refrigerating the cake allows the graham crackers to soften and absorb the moisture from the pudding, creating that soft, eclair-like texture. Aim for at least 4 hours of refrigeration, but overnight is even better. This gives the flavors time to meld together and allows the cake to set properly.
Variations and Tips for No-Bake Eclair Cake Success
Want to customize your no-bake eclair cake? Here are a few ideas:
- **Chocolate Pudding:** Swap the vanilla pudding for chocolate pudding for a double-chocolate delight.
- **Peanut Butter:** Add a layer of peanut butter between the graham crackers and pudding.
- Coffee Flavor: Add a teaspoon of instant coffee to the milk when making the pudding for a subtle coffee flavor.
- **Toppings:** Sprinkle chopped nuts, chocolate shavings, or sprinkles over the frosting for added visual appeal and flavor.

Your No-Bake Eclair Cake Awaits!
So there you have it – a simple, delicious, and completely no-bake way to satisfy your eclair cravings. This No-Bake Chocolate Eclair Cake is a guaranteed hit at any gathering. Grab your ingredients, follow these easy steps, and prepare to be amazed by how effortlessly you can create this classic dessert! Enjoy!
