Imagine waking up to the smell of freshly baked bread, without having to spend hours kneading and fussing in the kitchen. Sounds too good to be true? It’s not! Let’s explore the wonderful world of the easiest no-knead bread – a simple technique that yields amazing results with minimal effort.
What is No-Knead Bread and Why Is It So Great?
No-knead bread is exactly what it sounds like: bread that doesn’t require any kneading! This revolutionary method simplifies bread-making, making it accessible to everyone, even those intimidated by traditional recipes. It relies on a long, slow fermentation process to develop gluten, resulting in a flavorful and chewy loaf with a beautiful crust.
 A beautiful photo of a freshly baked loaf of no-knead bread, crusty on the outside and soft on the inside.
The Magic of Slow Fermentation
The key to no-knead bread is time. Instead of vigorous kneading to develop the gluten (the protein that gives bread its structure), the dough rests for a long period – usually 12-18 hours – allowing the yeast to slowly work its magic. This slow fermentation not only develops the gluten but also enhances the flavor of the bread.
- Enhanced Flavor: The longer fermentation allows complex flavors to develop, resulting in a richer, more nuanced taste.
- Simplified Process: No strenuous kneading required! Just mix, rest, and bake.
- Easy to Adapt: The basic recipe can be easily customized with different flours, seeds, and flavorings.
 A close-up photo showing the airy texture of no-knead bread after the long fermentation process.
Basic Ingredients You’ll Need
The best part about no-knead bread is that it requires only a few simple ingredients you probably already have in your pantry:
- Flour: All-purpose flour works well, but you can also experiment with bread flour or whole wheat flour.
- Yeast: Use active dry yeast or instant yeast.
- Salt: Essential for flavor and controlling the yeast.
- Water: Lukewarm water activates the yeast.
 A photo showcasing the four basic ingredients: flour, yeast, salt, and water, arranged artfully on a wooden surface.
The Easiest No-Knead Bread Recipe: Step-by-Step
Ready to bake your own amazing no-knead bread? Here’s a simple recipe to get you started:
Ingredients:
- 3 cups (384 grams) all-purpose flour
- 1/4 teaspoon instant or active dry yeast
- 1 1/4 teaspoons salt
- 1 5/8 cups (375 milliliters) lukewarm water
Instructions:
- Mix the ingredients: In a large bowl, combine the flour, yeast, and salt. Add the water and stir until just combined. The dough will be shaggy and sticky.
- First Rise: Cover the bowl with plastic wrap or a lid and let it rest at room temperature for 12-18 hours.
- Shape the Dough: After the first rise, the dough will be bubbly and doubled in size. Lightly flour a work surface. Gently turn the dough out onto the floured surface. Shape it into a round.
- Second Rise: Place the dough on a piece of parchment paper. Cover with a clean kitchen towel and let it rise for another 30 minutes.
- Preheat the Oven: Place a Dutch oven (with the lid) in the oven and preheat to 450°F (232°C).
- Bake the Bread: Carefully remove the hot Dutch oven from the oven. Remove the lid. Gently lift the dough using the parchment paper and place it into the Dutch oven. Cover with the lid.
- Bake Covered: Bake for 30 minutes with the lid on.
- Bake Uncovered: Remove the lid and bake for another 15-20 minutes, or until the crust is golden brown.
- Cool: Remove the bread from the Dutch oven and let it cool completely on a wire rack before slicing and serving.
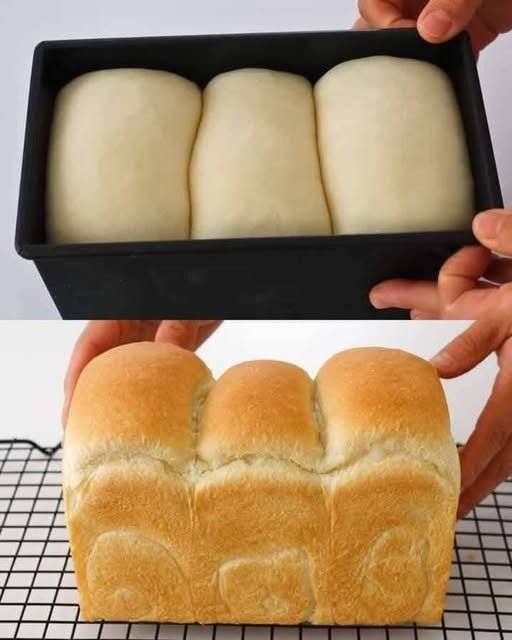
A series of photos showing the different steps of the no-knead bread recipe, from mixing the ingredients to baking the finished loaf.
Tips and Tricks for Perfect No-Knead Bread
Choosing the Right Flour
While all-purpose flour is a great starting point, experimenting with different flours can yield interesting results. Bread flour will create a chewier loaf with a stronger structure, while whole wheat flour will add a nutty flavor and denser texture. Try a blend of different flours for a unique flavor profile.
A display of different types of flour, such as all-purpose, bread, and whole wheat flour, in separate containers.
Dealing with Sticky Dough
No-knead dough is naturally very sticky. Don’t be tempted to add more flour during the initial mixing. Instead, embrace the stickiness! A well-hydrated dough is key to a light and airy loaf. Lightly flour your hands and work surface when shaping the dough to prevent it from sticking.
A close-up photo of sticky no-knead dough being gently handled with floured hands.
Baking in a Dutch Oven
Baking no-knead bread in a Dutch oven is highly recommended. The enclosed environment traps steam, creating a crispy crust and a moist interior. If you don’t have a Dutch oven, you can use a regular baking sheet, but you may need to add a pan of water to the oven to create steam.
A photo of a Dutch oven with a golden-brown loaf of no-knead bread inside.
Conclusion
No-knead bread is a game-changer for home bakers. Its simplicity and delicious results make it a perfect choice for beginners and experienced bakers alike. So, gather your ingredients, embrace the slow fermentation process, and get ready to enjoy a warm, crusty loaf of homemade bread with minimal effort. Happy baking!