Introduction
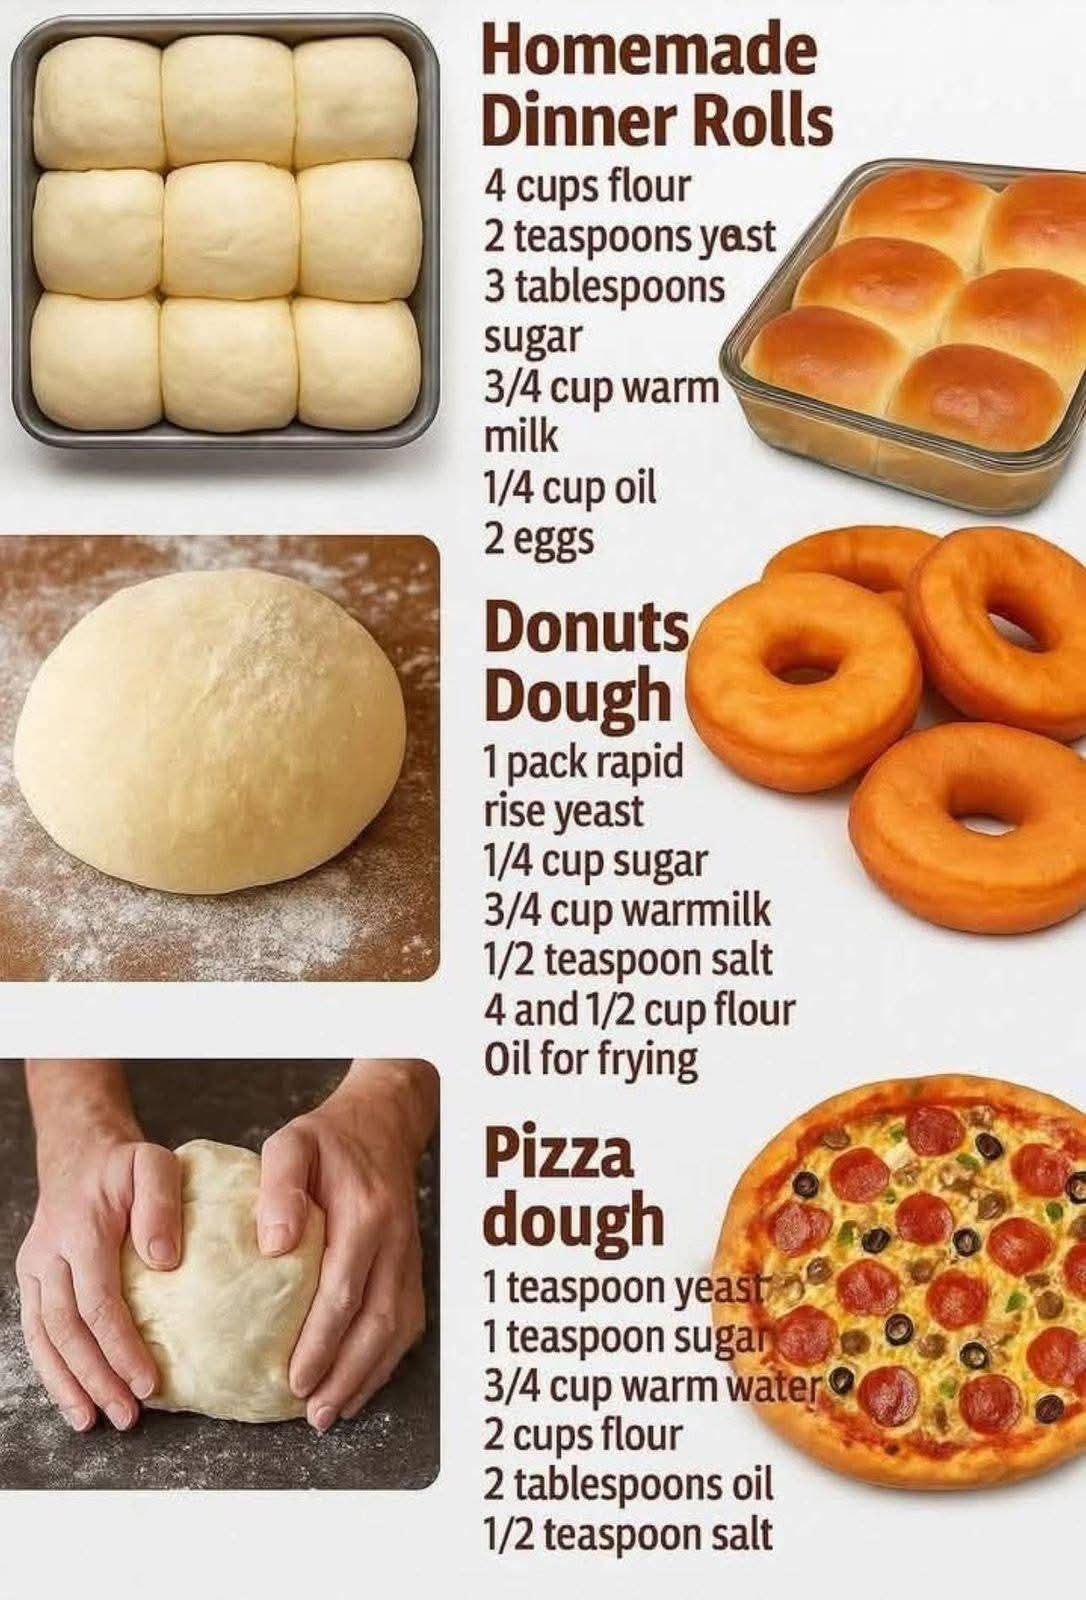
There’s nothing quite like the smell of freshly baked bread wafting through your home, especially when it’s the aroma of warm, golden homemade dinner rolls. Forget the store-bought kind – making your own dinner rolls is surprisingly simple and rewarding. This guide will walk you through creating the perfect batch, from understanding the ingredients to achieving that soft, fluffy texture everyone loves. Get ready to impress your family and friends with this easy-to-follow recipe and elevate any meal!
[
Mastering Homemade Dinner Rolls
Making perfect dinner rolls doesn’t have to be a daunting task. We’ll break down the essential steps and provide tips and tricks to ensure your rolls are always a crowd-pleaser. From activating the yeast to shaping the dough, let’s explore the secrets to baking delicious, homemade dinner rolls.
Understanding the Ingredients
The foundation of any great bread recipe lies in its ingredients. Let’s take a closer look at what makes homemade dinner rolls so special.
* **Flour:** All-purpose flour is a great starting point, but bread flour will give you a chewier, more structured roll.
* **Yeast:** This is your leavening agent! Ensure your yeast is active by proofing it in warm water with a pinch of sugar. King Arthur Baking provides a comprehensive guide to understanding different types of yeast.
* **Liquid:** Milk or water provides the moisture needed for the dough to come together. Milk adds richness and a softer texture.
* **Fat:** Butter or shortening adds flavor and tenderness. Melted butter is a classic choice!
* **Sugar:** A little sugar not only adds sweetness but also helps activate the yeast.
* **Salt:** Don’t forget the salt! It balances the sweetness and enhances the overall flavor.
[
The Art of Dough Kneading
Kneading develops the gluten in the flour, which gives the rolls their structure and elasticity.
* **By Hand:** Knead on a lightly floured surface for 8-10 minutes until the dough is smooth and elastic.
* **Using a Stand Mixer:** Use the dough hook attachment and knead on medium speed for 6-8 minutes.
* **The Windowpane Test:** A good indicator of proper kneading is the “windowpane test.” Gently stretch a small piece of dough. If it stretches thin enough to see light through it without tearing, it’s ready!
[
Proofing: Patience is Key
Proofing is when the yeast does its magic, allowing the dough to rise and become light and airy.
* **First Proof:** Place the dough in a lightly oiled bowl, turning to coat. Cover with plastic wrap or a damp towel and let rise in a warm place for 1-1.5 hours, or until doubled in size.
* **Second Proof (After Shaping):** After shaping the rolls, place them on a baking sheet and let them rise again for 30-45 minutes.
[
Shaping Your Dinner Rolls
There are many ways to shape dinner rolls, but here’s a simple and classic method:
1. Punch down the dough to release the air.
2. Divide the dough into equal portions (around 12-16 rolls).
3. Roll each portion into a smooth ball.
4. Place the rolls on a baking sheet, leaving some space between them.
[
Baking to Golden Perfection
Baking is the final step in creating those perfect homemade dinner rolls.
* **Oven Temperature:** Preheat your oven to 375°F (190°C).
* **Baking Time:** Bake for 15-20 minutes, or until the rolls are golden brown on top.
* **Golden Crust:** Brush the tops with melted butter before baking for extra flavor and a beautiful golden crust.
* **Even Baking:** Rotate the baking sheet halfway through baking to ensure even browning.
[
Serving and Storing Your Rolls
The best way to enjoy your homemade dinner rolls is warm, fresh from the oven!
* **Serving Suggestions:** Serve with butter, jam, or alongside your favorite meal.
* **Storage:** Store leftover rolls in an airtight container at room temperature for up to 2 days or in the freezer for longer storage.
* **Reheating:** Reheat frozen rolls in a warm oven for a few minutes to restore their soft texture.
[
Conclusion
Homemade dinner rolls are a delightful addition to any meal, offering a comforting and flavorful experience that store-bought versions simply can’t match. With a little practice and patience, you can master the art of baking these warm, fluffy treats in your own kitchen. Remember to focus on quality ingredients, proper kneading, and allowing enough time for proofing. So, go ahead and try out this recipe – your family and friends will thank you for it! Enjoy the satisfaction of serving homemade dinner rolls and savor every bite.