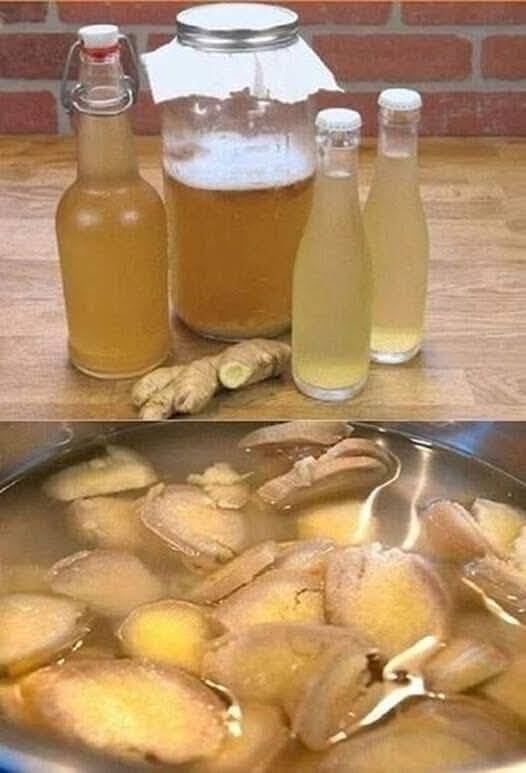
Ever dreamt of brewing your own bubbly, spicy-sweet beverage? Traditional fermented ginger beer is a surprisingly simple and incredibly rewarding project. Forget store-bought sodas filled with artificial flavors; this recipe lets you control every ingredient for a truly authentic and delicious drink. So, grab your ingredients, and let’s get brewing!
What is Traditional Fermented Ginger Beer?
Unlike commercial ginger ale, traditional ginger beer gets its fizz and unique flavor from fermentation. This involves using a “ginger bug,” a culture of wild yeasts and bacteria that, when fed with ginger and sugar, creates a naturally carbonated and subtly tangy beverage. It’s a delightful process that brings out the best of the ginger’s spicy warmth. Think of it as a fun science experiment that ends with a refreshing drink!
Making Your Own Ginger Bug (The Starter)
The heart of authentic ginger beer is the ginger bug. Don’t let the name intimidate you; it’s simply a culture of beneficial yeasts and bacteria that will give your ginger beer its fizz and flavor.
Building Your Ginger Bug: Step-by-Step
Creating a ginger bug takes a few days, but it’s mostly hands-off. Here’s how:
- Day 1: In a clean glass jar, combine 2 tablespoons of grated fresh ginger (unpeeled, organic is best) and 2 tablespoons of sugar (cane sugar or organic sugar is great) with 2 cups of non-chlorinated water. Stir well.
- Day 2 and onwards: Each day, add 2 tablespoons of grated fresh ginger and 2 tablespoons of sugar to the jar. Stir well.
- Wait for the Magic: Within a few days (usually 3-7 days), you should see bubbles forming, indicating that fermentation has begun. The mixture should smell slightly yeasty and gingery. This is your ginger bug, ready to make ginger beer! If you are in a colder climate, it will take longer.
Important Note: Use non-chlorinated water, as chlorine can inhibit the growth of the culture. Filtered water or water that has been left to sit uncovered for 24 hours is ideal. You can learn more about water filtration here.

Maintaining a Healthy Ginger Bug
Once your ginger bug is active, you’ll want to keep it healthy. Continue to “feed” it regularly (every 1-2 days) with fresh ginger and sugar, even when you’re not actively making ginger beer. If you’re taking a break from brewing, you can store your bug in the refrigerator, feeding it once a week. Before using it again, bring it back to room temperature and feed it a few times to reactivate it.

Traditional Fermented Ginger Beer Recipe
Now that you have a lively ginger bug, it’s time to make some ginger beer!
Ingredients You’ll Need
- 1 cup active ginger bug
- 1 gallon non-chlorinated water
- 1-2 cups sugar (adjust to taste)
- 2-4 ounces fresh ginger, grated (adjust to taste)
- Juice of 2-3 lemons or limes (optional, adds a nice tang)

Instructions: Brewing Your Ginger Beer
- Prepare the Base: In a large pot, combine the water, sugar, and grated ginger. Bring to a simmer, stirring until the sugar dissolves. Let it cool completely.
- Combine and Ferment: Strain the cooled ginger mixture into a fermentation-safe container (glass carboy, plastic bucket, or large jar). Add the lemon or lime juice (if using) and the ginger bug. Stir gently.
- First Fermentation: Cover the container with a breathable cloth secured with a rubber band (or use an airlock). This allows gases to escape while preventing insects from entering. Ferment at room temperature (68-78°F/20-26°C) for 1-3 days, or until you see signs of fermentation (bubbles, foam). Taste it daily; it should be slightly sweet and tangy.
- Bottle It Up: Once it reaches your desired flavor, strain the ginger beer to remove the ginger and yeast sediment. Pour into airtight bottles (swing-top bottles or plastic soda bottles work well, but use caution as pressure builds). Leave about an inch of headspace at the top.
- Second Fermentation (Carbonation): Allow the bottles to sit at room temperature for 1-3 days, or until they are sufficiently carbonated. Check the pressure regularly – plastic bottles will feel firm.
- Chill and Enjoy: Refrigerate the bottles to slow down fermentation and prevent them from exploding. Let them chill for at least a few hours before opening. Open carefully over a sink, as they may be quite fizzy!
Safety First: Always use proper bottling techniques and monitor the pressure in your bottles to prevent explosions. Over-carbonation can be dangerous.

Tips for Success and Troubleshooting
- Adjust Sweetness and Spice: Don’t be afraid to experiment with the amount of sugar and ginger to suit your taste.
- Temperature Matters: Warmer temperatures speed up fermentation, while cooler temperatures slow it down.
- Slow or No Fermentation: If your ginger beer isn’t fermenting, your ginger bug might not be active enough. Try feeding it more frequently or using a warmer location.
- Contamination: If you see mold or off-putting smells, discard the batch. Sanitize your equipment thoroughly to prevent future contamination.
Conclusion
Making traditional fermented ginger beer is a journey of flavor and a fascinating exploration of fermentation. With a little patience and experimentation, you can create a delicious and refreshing beverage that is far superior to anything you can buy in a store. So, start your ginger bug, gather your ingredients, and get ready to enjoy the wonderful world of homemade ginger beer! Cheers to your health, and happy brewing!
That analysis was spot on! Seeing strategic play really elevates esports, and a platform like 365jl vip app download seems to understand that level of engagement. Legit security is key for serious players! 💯